How To Clean a Really Burnt Pot
Today I’m going to show you how to clean a really burnt pot.
I’m not a bad cook. Really I’m not. I may not be the finest chef in the world, but I can cook. (At least my husband says so. ;))
Yesterday though, yesterday I made my most shameful cooking blunder to date. Yes, it was worse than that one time I forgot about the steak I was grilling and nearly set the porch on fire.
So, just a little backstory here…
My mother gave me a pressure cooker for Christmas this past year. The instruction manual it came with claims that it is the most useful piece of cookware you will ever own. I would have to agree. (Although a well-seasoned cast iron skillet is a very close second.) Since I pulled it out of the box I have used that baby several times a week. Sometimes almost every day of the week.
I love my pressure cooker! Homemade refried beans, hummus, pot roast, turkey breast, stews, chicken, and… rice.
Brown rice.
I’ve cooked brown rice in my pressure cooker many, many times. This wasn’t something new to me.
Yesterday I set about making dinner. Grilled chicken, steamed green beans, and savory brown rice. Yum! I had my chicken coming along nicely, my green beans ready to go on the stove, and my rice in the pressure cooker, cooking away.
Maybe I had a mom moment, I don’t know what else to call it. When using a pressure cooker you absolutely must turn down the heat once it is pressurized. I totally forgot!
I did not turn down the heat. Instead, I let the rice cook inside the pressure cooker for twenty whole minutes… on high.
A burning smell began to fill my little kitchen. Then came the smoke, and for the life of me, I could not figure out where it was coming from. I thought perhaps I had spilled something on my electric burner, I kept looking for the source.
I did finally realize what the problem was, but by that time my rice was too far gone.
In a second I yanked the pressure cooker, now pouring smoke, off the stovetop. The pot was so hot, it immediately caught the hot pad I had slipped underneath on fire. I, now slightly panicked, slammed the pot back down on the stove and shook the hot pad. Once the fire was out, I carefully grabbed the handles of the pressure cooker and ran it outside. I set it on the wooden rail of my porch and watched it smoke, making sure that it didn’t catch something else on fire!
It was nearly thirty minutes later when there was no more smoke escaping the lid. The pressure button still indicated the pot was pressurized, so I left it outside until morning.
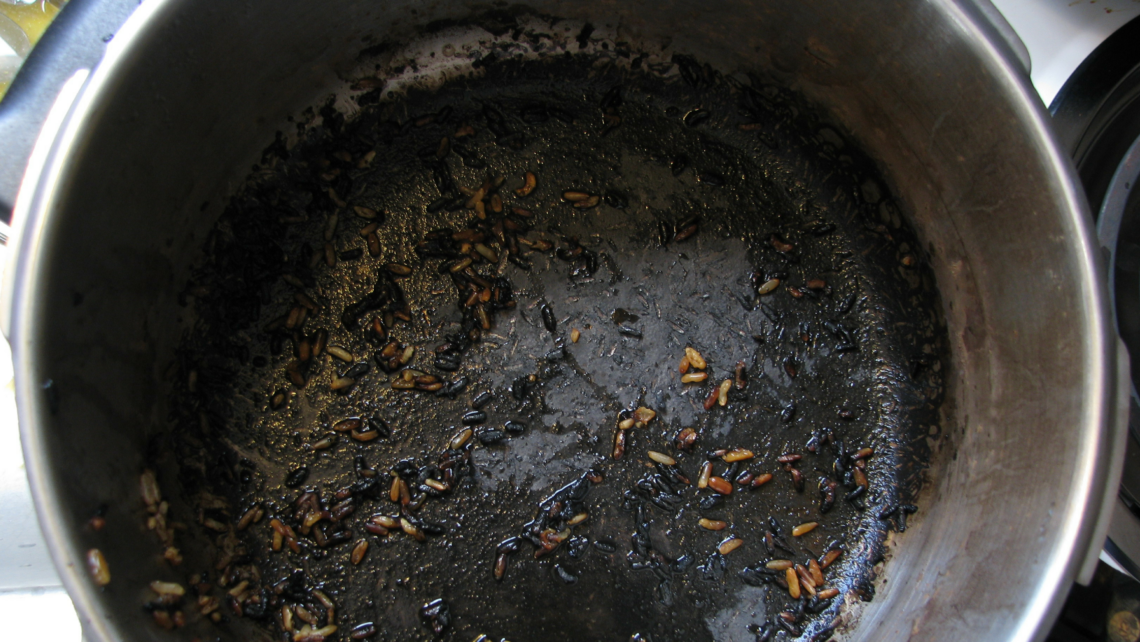
How I wished I took a photo of the rice in the pot for you all to see. It was bad folks! Black. All burnt and black and yucky. There is no telling how long it had sat there and dry-boiled.
Here is a what it looked like after I scraped out most the charbroiled remains of the rice. I was left with all sorts of nastiness. Just look at it!

Ew.
I knew that no normal wash would get this puppy cleaned, and I certainly didn’t want to sit there and scrub at it for a long time either. Am I the only one who has ever done this? Hopefully not! If you have a pot that resembles mine, do not despair! There is hope! I followed these super simple steps to get my pot clean once again.
How to Clean A Really Burnt Pot:
- Cover the bottom of your pot with Baking Soda and give it a quick scrub to remove most of the larger burnt particles of food. Don’t worry about trying to clean the pot all in this first step, simply remove most of the charcoal. 😉 (You won’t need to use as much Baking Soda as I did in the photo… I went a little Baking Soda crazy!)

How to clean a really burnt pot - Pour in two cups of vinegar, along with enough hot water to cover all of the burnt areas. Bring it to a boil, then turn it off and let that soak for two hours. (I did not bring the vinegar to a boil in my case because the smokey smell was too strong for me.)

Clean a really burnt pot - Pour out the vinegar and water. The burnt residue should be loose enough to scrape off. Spend about a minute or so scraping as much off as you can.
- Add just enough baking soda to cover the bottom of the pot and give your pot a final scrub. There is just no way to completely avoid a little elbow-grease guys, I’m sorry! This method definitely helps cut down the scrubbing time though!

Clean a really burnt pot

There you go! This is what it looked like at the end.
As you can see there is still some staining in the bottom of the pot. I hate to say it, but there really is no way to restore the pot completely back to the shiny stainless steel it once was. You will be able to get it completely clean, but you may be left with some discoloring. No worries, it is totally safe to continue using.
Stainless steel is generally accepted as a perfectly safe piece of cookware, even with some discoloration. So take heart! Your pot may not be as new looking as it once was, but there is no need to throw it away.
There is some debate on how safe the non-stick coating on pots and pans is. Personally, if I had burnt a non-stick pot that bad, I would just throw it away and not risk potentially allowing harmful chemicals in my food.
I tend to get super distracted all the time, (thanks, right brain!)
If you are like me at all, you’ll want to focus just on your cooking when you are cooking. 😉
I was doing laundry and feeding my Little when the whole rice fiasco went down.
Hopefully, you all never have anything looking as bad as I did, but if you happen to do so, I hope this helps you clean out your pot without too much trouble.
Happy Cooking!
~N


26 Comments
travelwriter73
I will have to try this next time (there will be one LOL)
travelwriter73
I will have to try this next time, there will be a next time! LOL
Nikki
Haha! No matter how hard I try to stay focused on cooking, something always happens. Mom life right? (Though usually it’s not that bad!) 😉
Cait
oh my gosh what! this ALWAYS happens to me ha and def going to take a look at doing something like this too! thank so much!
Nikki
No problem Cait, I’m so glad you found this helpful!
Jessie
Omg!!! Thank you for this. I ruin so many brushes and sponges trying to get the burnt food out of the pan.
Nikki
You are so welcome! I know, I used to as well… Also my hands were always in a sad state too!
Kelly Bolen
Great advice! Although I would love to know what else you cook in the pressure cooker! I have one but rarely use it as it scares the crap out of me! =)
Nikki
It scared me too the first few times I used it… and especially after I really burnt it! But now I’m pretty comfortable with it. I really only use it for beans, brown rice, chickpeas, lentils and the likes, but you can use it for meals and meats too! There’s a lot of helpful tips and recipes out there online. This place has some pretty cool dinner recipes that use a pressure cooker. 🙂 https://www.seriouseats.com/2017/03/pressure-cooker-recipes.html
Own Your Fancy
Thanks for this, I have scrubbed myself to death in the past. Baking soda really is a cure all.
Nikki
It is!! I use it all the time!
myslightlychaoticlife
I totally need to remember this next time that I burn a pot! This actually happens often to me since I’m a terrible cook! Thank you for the tip!!
Nikki
Aw, I’m sure you’re not as bad as I am! 😉
Veronika
It’s so refreshing to hear tips with baking soda and vinegar instead of some expensive cleaner. I’m going to give this a try, thanks!
Nikki
Yes! I always opt for natural cleaners whenever possible! Way better than all the yucky chemicals that are in most cleaners.
hippiepoints
You sound just like me! Thanks for the tip. I also thing that my cast iron skillet is amazing. But I have to say, for us the most useful kitchen equipment is my air fryer..
Nikki
Really? I’ve been thinking about getting one! What is it that makes it your number one, most useful piece of equipment?
hippiepoints
I make everything in there. It toasts, it heats things up, it cooks a whole chicken in an hour, perfect French fries, it’s a small oven, that heats up quick. We got rid of our microwave, toaster over and toaster. I
Kindly Unspoken
Vinegar and baking soda have so many awesome uses around the home and I love using it especially in the kitchen! Great tip 🙂
Nikki
They really do! It makes my cleaning a breeze!
jill conyers
When I read the title of your post I wondered if you were going to use vinegar and baking soda. Good to know.
Nikki
I love using those two for cleaning around the house! 🙂 They are miracle workers!
Chelsea
Holy crap, that stuff is like MAGIC!!!!! Good to know!
Nikki
Yes!! And I needed some magic to clean that! 😉
tpicou10
Oh wow! You worked some magic on that pot! I’ll have to keep this in mind.
xx Tatyanna
http://www.apopoflife.com
Nikki
Thank you friend, I’m glad you found this helpful